As a creative small business owner, having fresh photos of yourself for content is key. I’m a big proponent of investing in quality brand images, but there are lots of times when you may wish to take a headshot of yourself for social media between those brand sessions. I get brand photos done at least once a year, but I still like to take my own headshots for YouTube thumbnails and other projects that may come up. So today, I’m going to be sharing with you how to take your own professional headshots at home.
As you’ll see in the video, I am welcoming you into my home office that I turned into a studio for a how-to on taking your own headshots from home, and BONUS, I’m sharing with you my camera settings, lens, camera body, backdrop, and final images. I want to help you feel confident, ready, and equipped, so, let’s get to it!
How To Take Your Own Headshots At Home
The Setup
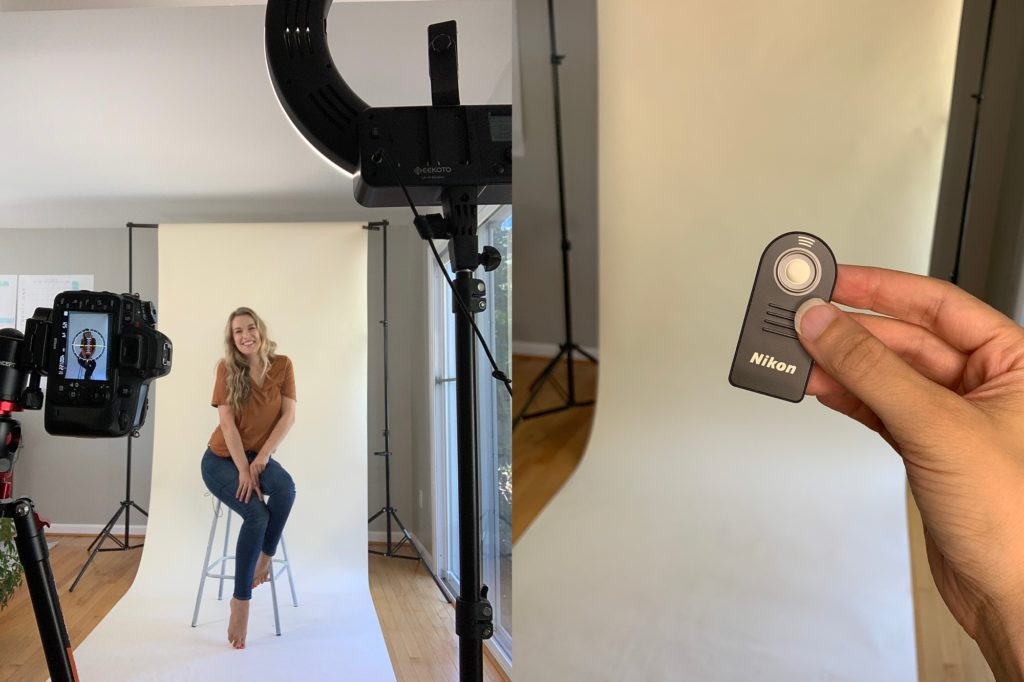
A super affordable, home studio setup is possible, and I want to start with showing you how I set things up. I have my stand and my paper in pink or tan. The paper I ordered is about 36 inches wide. It’s more narrow than I was expecting so my suggestion would be to go wider if you decide to grab one. But I was able to pull it off because the pictures I had in mind were up close headshots and ones where you can see the stand. I wanted a peek-behind-the-curtain feel. So, it still looked studio, and you can see the setup. Something to keep in mind is that I typically remove the background in these types of pictures. This for me meant it didn’t matter if I was coming right up to the edge of the backdrop. Either I could have extended it in post-production or cut out for things like my YouTube banner or thumbnails.
Extra Tip: These look best when you’re against a generally white wall or paper back drop like the one in this video. When editing those, I use Canva, but you can use Photoshop as well.
I opened up my tripod, which basically extends into my dining room. I converted my living room with my desk and my office. I had the backdrop almost extended as tall as the stands would let me. I think I could’ve gone a little taller, but I was still able to accomplish what I was envisioning. With me being seated for the photos, it was plenty tall.
Equipment
Next, I want to discuss equipment. You will see on the camera in the video that the backdrop doesn’t extend all the way across the picture. That’s totally okay because I wanted to first get my settings dialed in. Then I figured out compositionally what I was doing. My plan was to use natural light for some of the shots. Then I would incorporate either my ring light or flash. I captured both so you could see the difference. There was a fair amount of natural light on both sides as well.
For these headshots, I used a remote and definitely suggest using one if you plan to take more than an image or two. You will need to put your camera on the remote setting in order to take images using a remote *see the video for details*. The camera body I used was the Nikon D610. It’s older, and I’ve gotten tons of use out of it. I chose “quick-response” mode for shooting with a remote for today’s shoot. I also had my camera set to ISO 400, F/4.0 1/125 Sec for the entire time.

Thoughts After Shooting
I have some final thoughts for you that I hope will help with your own shooting at home. First, the remote was helpful, but not always responsive when I click it. That was a little tricky. I had to also take off my mic because the cord was getting in all the pictures. For this setup, I only used one video light and my ring light to front light me just a little bit. Other than that, it was all natural light. Although what I did worked really well, I definitely wish I had a wider backdrop. I’ll be ordering one of those right away. Something just 2 feet wider on either side would have made a huge difference and also would give me the ability to shoot horizontally.
Another great use for this backdrop would be recording reels or creating short videos on my phone to turn into GIFs. You can see examples of this on my Instagram.
And of course, leave a comment below if you have any questions or want more information on how to take your own headshot/portraiture that’s studio style. I had so much fun shooting this. I’m looking forward to sharing more on how I create my content.
If you decide to use any of the links above and buy through them, I’ll receive a small commission back. All of those affiliate income commissions really add up over time and help generate revenue to help support this channel
